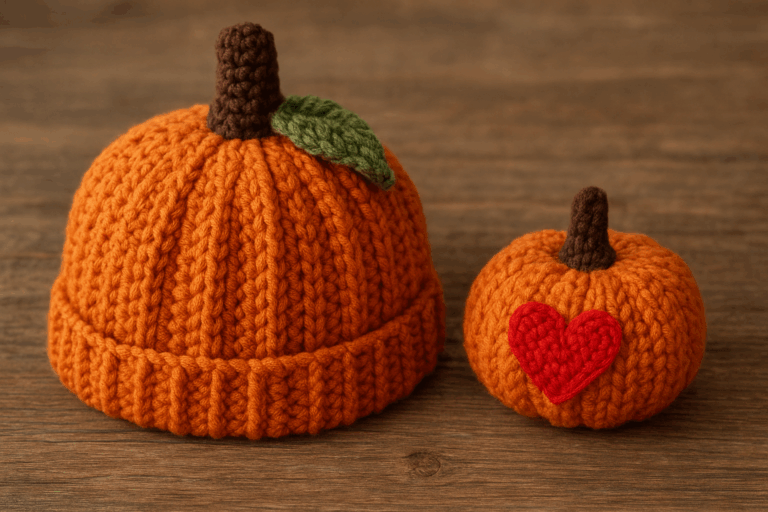
As the crisp air of autumn sets in, nothing captures the cozy spirit of the season quite like handmade crochet pieces. In this tutorial, we’ll guide you through creating two adorable fall projects: a crochet pumpkin hat and a mini pumpkin with a red heart. These designs are perfect for adding warmth, charm, and personality to your fall wardrobe and home décor. Whether you’re a beginner or an advanced crocheter, this step-by-step guide will help you master both projects with ease.
From stylish accessories to cute seasonal decorations, crochet crafts continue to trend online, especially around Halloween, Thanksgiving, and harvest festivals. By combining creativity with high-value .
Materials You’ll Need
Before diving into the magic of crochet, let’s gather the necessary tools and materials. Both projects require only a few simple supplies that you might already have in your crafting kit.
For the Crochet Pumpkin Hat:
- Yarn: Orange, brown, and green (medium-weight cotton or acrylic yarn)
- Hook: 4.0 mm or 5.0 mm crochet hook
- Tapestry needle: For weaving in ends
- Scissors: Sharp for clean cuts
- Measuring tape: To ensure correct sizing
For the Mini Pumpkin with Red Heart:
- Yarn: Orange for the pumpkin, brown for the stem, and red for the heart
- Hook: 3.5 mm or 4.0 mm
- Stuffing: Polyester fiberfill
- Sewing needle: To attach the heart securely
- Stitch markers: Optional but helpful for keeping track of rounds
These tools are affordable, beginner-friendly, and can be reused for many other DIY crochet crafts.
Crochet Pumpkin Hat Tutorial – Step by Step
Let’s start with the crochet pumpkin hat, a cozy accessory that makes the perfect addition to any fall outfit. It’s great for adults, kids, or even as a Halloween costume base.
Step 1: Crochet the Ribbed Band
- Chain 8 stitches.
- Single crochet in the second chain from the hook and across.
- Chain 1, turn, and single crochet in the back loop only across each row.
- Repeat until the band fits snugly around your head.
- Slip stitch the ends together to form a loop.
Step 2: Create the Body of the Hat
- Chain 2 and begin working double crochet stitches around the edge of the band.
- Continue working in rounds until the hat reaches the desired height (around 7–9 inches).
- Gradually decrease by skipping stitches every few rounds until you can close the top.
- Use a tapestry needle to weave the yarn through the last round and pull tight to close.
Step 3: Add the Pumpkin Stem and Leaf
- For the stem, attach brown yarn to the top center and crochet 6 single crochets in a magic ring.
- Work in continuous rounds for 4–5 rows.
- Fasten off and weave in ends.
- For the leaf, use green yarn and chain 6; then, single crochet, half-double crochet, and double crochet across to form a natural leaf shape.
- Sew the leaf beside the stem for a realistic pumpkin look.
Your pumpkin crochet hat is now complete—a soft, stylish accessory that’s both playful and functional.
Mini Pumpkin with Red Heart Tutorial
Now let’s move on to the mini pumpkin with a red heart, a charming craft that makes a great fall gift, ornament, or home decoration.
Step 1: Make the Pumpkin Body
- Start with orange yarn and make a magic ring.
- Crochet 6 single crochets into the ring.
- Increase in each stitch around (12 stitches).
- Continue increasing evenly until you have about 30 stitches in total.
- Work several rounds without increasing to create the height of the pumpkin.
- Begin decreasing in the same pattern until the pumpkin closes almost completely.
- Stuff with fiberfill and close securely.
Step 2: Create the Pumpkin Stem
- Use brown yarn and make a magic ring.
- Crochet 5 single crochets and work 3–4 rows to form a small cylinder.
- Attach the stem to the top center of the pumpkin.
Step 3: Add the Red Heart
- Use red yarn to create a mini heart. Chain 5, and in the first chain, make 3 treble crochets, 3 double crochets, 1 treble crochet, and slip stitch back to form the heart shape.
- Sew the heart onto the front of the pumpkin using a sewing needle.
The mini pumpkin with a red heart symbolizes warmth, love, and the handmade beauty of the fall season—a great piece to gift or display on your mantel.
Creative Ideas and Customization Tips
Once you’ve mastered both patterns, you can customize your crochet creations in countless ways:
- Color variations: Try white, green, or golden pumpkins for a modern farmhouse vibe.
- Embellishments: Add buttons, embroidery, or glitter thread for a unique touch.
- Personalization: Stitch initials, small beads, or ribbons for gifting purposes.
- Matching sets: Create a parent-and-child pumpkin hat duo or combine the mini pumpkin with other fall-themed amigurumi like acorns or leaves.
- Home décor: Use your mini pumpkins as table centerpieces, garland ornaments, or cozy accents for fall photo shoots.
These ideas make your crochet pieces not only beautiful but also marketable if you sell on Etsy or at craft fairs.
Final Thoughts: Spread the Warmth of Handmade Fall Creations
Crocheting your own pumpkin hat and mini pumpkin with red heart is more than just a craft—it’s an act of love, creativity, and tradition. Each stitch represents care and dedication, resulting in beautiful pieces that capture the magic of the fall season.
Whether you’re crafting for fun, for your loved ones, or to sell online, these patterns offer the perfect blend of simplicity and charm. With their warm colors and cozy textures, your handmade pumpkins will stand out as timeless symbols of autumn comfort.
So grab your hook, your yarn, and your favorite fall playlist—it’s time to crochet your way into the heart of the season!


