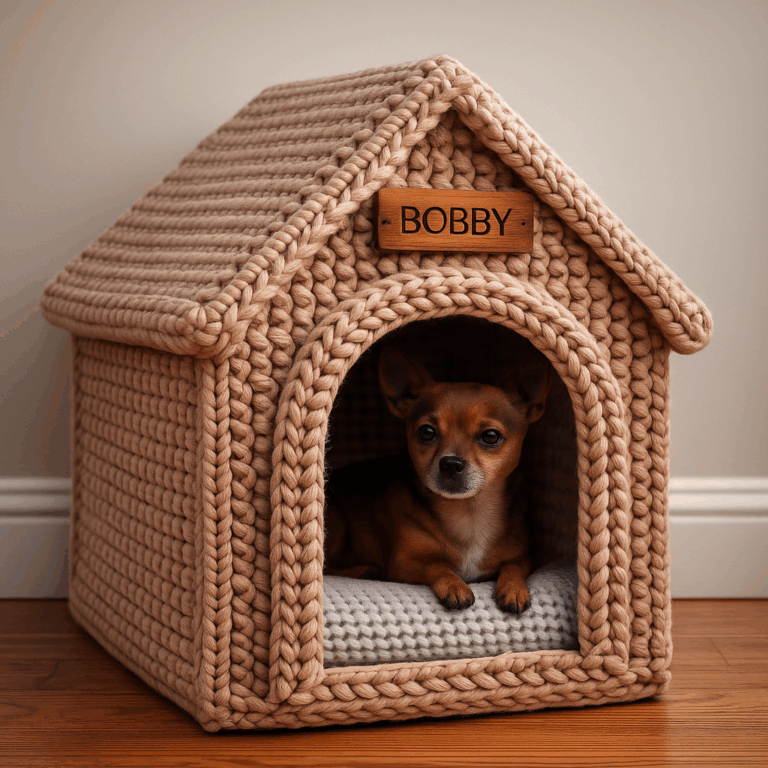
Crochet projects for pets have become increasingly popular thanks to their charm, warmth, and handmade quality. Among these creations, the crochet dog house stands out as a functional and decorative piece that keeps pets comfortable while adding style to any home. Whether you’re an experienced crocheter or just learning, making a dog house is a rewarding project that provides your furry friend with a safe and cozy retreat.
In this detailed guide, you’ll learn everything you need to craft your own crochet dog house, including essential materials, construction techniques, shaping tips, and assembly instructions.
Understanding the Structure of a Crochet Dog House
Before starting your crochet dog house, it’s important to understand the general structure. Most crochet pet houses are shaped like a small hut or cube with a large opening in the front. The sides and roof must be firm enough to stand upright, meaning you’ll need thick yarn and a tight stitch pattern.
Typically, the dog house is made using the following components:
- Base (floor)
- Four side panels
- Roof (single or double piece)
- Front doorway
Because structural stability is essential, crocheters often use:
- Bulky or super bulky yarn
- Single crochet (sc) or half double crochet (hdc) for a dense texture
- Foam board, plastic canvas, or extra layers for reinforcement
Choosing the structure before you begin helps ensure that the dog house fits your pet’s size and remains durable over time.
Materials and Tools You Will Need
Gathering the correct supplies is a major part of the process. Using strong materials will help the dog house maintain its shape and last longer.
Recommended Materials
- Super bulky yarn (approximately 700–1000g depending on size)
Cotton or polyester blends work especially well because they hold their shape.
- Crochet hook size 8 mm or 9 mm
A large hook creates thick, sturdy fabric.
- Scissors
- Stitch markers
- Tapestry needle for sewing the panels together
- Foam sheets, plastic canvas, or cardboard (optional but highly recommended for stability)
- Soft cushion or small pet pillow for the inside
Choosing a Color
Soft neutrals like gray, beige, or cream are great for home decor, while bright colors like red or blue create a fun, playful look. You can also create stripes or textured patterns if you prefer.
Step-by-Step Crochet Instructions for the Dog House Panels
This section explains how to crochet each part of the dog house. The measurements can be adjusted depending on your dog’s size—small pets like Chihuahuas, Pomeranians, or toy poodles will fit perfectly in the standard measurements below.
A. Base (Floor Panel)
- Chain 40 (or the preferred width).
- Work single crochet (sc) in each stitch across.
- Chain 1, turn, and continue in sc for 35 rows or until the base becomes a perfect rectangle.
- Fasten off and weave in ends.
- If you want extra firmness, cut a piece of foam or cardboard the same size and set it aside for assembly.
B. Side Walls (4 Panels)
You will make four identical pieces for the walls.
- Chain 40.
- Work sc across the row.
- Continue crocheting rows until the piece is slightly taller than the base width—usually about 38–40 rows.
- For a front panel with a doorway:
- Crochet until row 20.
- On row 21, sc 10 stitches, chain 20, skip 20 stitches, sc the last 10 stitches.
- Continue crocheting normally for 10 more rows to form the top of the doorway.
C. Roof Panel(s)
You can create a single roof piece that folds over or two panels that meet at a seam.
Single-piece method:
- Chain 40.
- Crochet sc rows until the length equals the height of two walls combined.
- Fasten off.
Two-piece method:
- Make two rectangular panels the same width as the walls.
- Sew them together at the top, forming a V-shaped roof.
Using a tighter stitch on the roof helps it stay firm and prevents sagging.
Assembling and Reinforcing Your Crochet Dog House
Assembly is what brings your crochet dog house to life. Working carefully ensures the final piece is stable and neat.
A. Attaching the Walls to the Base
- Lay the base flat on a table.
- Place each wall panel around the edges of the base.
- Use a tapestry needle and yarn to whip stitch each panel to the base.
- Make sure the stitches are tight—this is critical for stability.
B. Sewing the Walls Together
- Sew the left wall to the front panel.
- Sew the right wall to the front panel.
- Attach the back panel last.
- Keep the seams strong by double stitching the corners if necessary.
C. Reinforcing the Structure
Insert foam or lightweight plastic between the layers of each panel before closing the seams. This step is optional but highly recommended for a professional finish.
D. Adding the Roof
- Position the roof on top of the house.
- Sew along the edges, leaving a slight overhang for a realistic look.
- If using two roof panels, sew them together at the top, then attach both sides to the wall panels.
Finishing Touches and Personalization
With the main structure complete, you’re ready to add personality and comfort to your dog house.
Add a cushion or blanket
Place a soft pillow or custom crocheted pad inside the house to keep your dog warm and comfortable.
Customize the exterior
You can enhance the dog house with:
- Crochet letters spelling your pet’s name
- Decorative flowers or bones
- Striped patterns or textured stitches
- A hanging toy at the entrance
Cleaning and Care Tips
- Hand-wash the dog house when possible.
- Use gentle soap to avoid damaging the yarn.
- Allow it to air dry to maintain shape.
Durability Tips
- Reinforce weak corners with extra stitches.
- Use sturdy yarn that doesn’t stretch easily.
- Add double layers for a thicker and stronger build.


