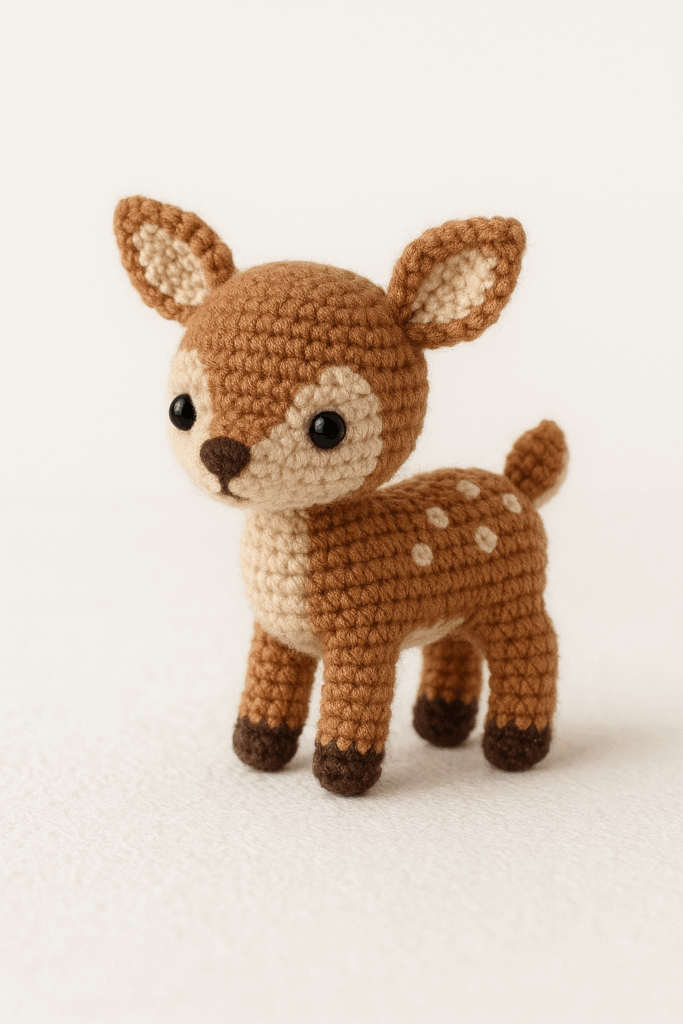
Crochet lovers adore creating adorable miniature creatures, and one of the most heartwarming projects for the holiday season is a tiny crochet reindeer for mini baby gifts. Whether you want to use it as a nursery decoration, Christmas ornament, or baby shower favor, this project combines creativity, warmth, and festive charm. In this guide, you’ll learn step-by-step how to make a crochet reindeer using simple techniques, perfect even for beginners.
Materials You Will Need
Before you start crocheting your mini baby reindeer, prepare all the essential materials. The right supplies make your project look professional and ensure that the final piece is soft and safe for babies.
Materials List:
Yarn: Cotton or acrylic yarn in beige, brown, white, and red (for the nose).
Hook: 2.0mm or 2.5mm crochet hook.
Safety eyes: 6mm or embroidered eyes for baby safety.
Stuffing: Soft polyester fiberfill.
Stitch marker: To keep track of your rounds.
Tapestry needle: For sewing and finishing.
Scissors and optional ribbon for decoration.
Tip: For baby items, use hypoallergenic and washable materials to ensure comfort and safety.
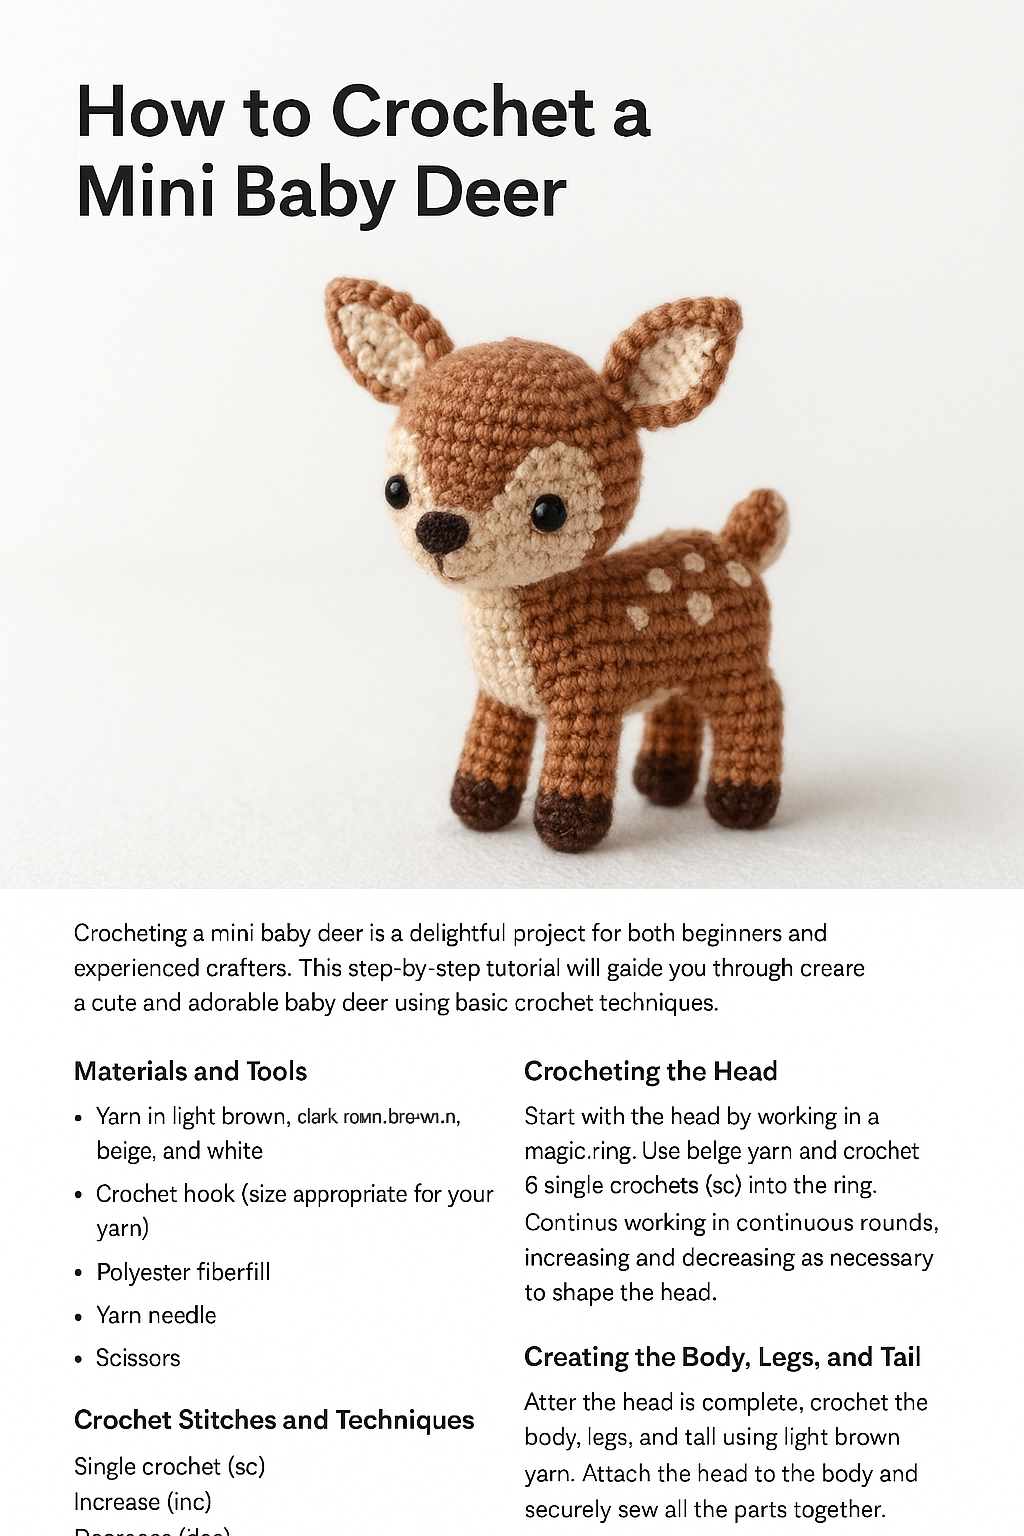
Creating the Head and Body
The mini reindeer is usually made in one continuous piece, starting from the head and working toward the body. This method gives a smooth and sturdy finish.
Step-by-Step Instructions:
Magic Ring: Start with a magic ring and crochet 6 single crochets (sc) inside it.
Increase Rounds:
Round 2: 2 sc in each stitch (12 stitches).
Round 3: 1 sc, 2 sc in next stitch around (18 stitches).
Build the Shape: Continue adding rounds until you reach 30 stitches. This forms the round head.
Eyes and Nose Placement: Insert safety eyes between rounds 8 and 9, about 6 stitches apart. Embroider a small red nose in the center.
Decrease for the Neck: Gradually reduce stitches to form a neck, then slightly increase again for the body.
Stuffing: Fill the head and body with fiberfill before closing the bottom with a slip stitch.
Pro Tip: Stuff the head firmly but evenly to keep its shape. Avoid overfilling the body to maintain softness.
Making the Ears, Antlers, and Legs
These tiny features bring your reindeer to life. Each element is small but adds huge personality to your creation.
Ears:
Make 2 small ovals with beige yarn.
Chain 4, sc in the 2nd chain, hdc in next, dc in the last, then turn and repeat on the other side.
Fasten off, leaving a long tail for sewing.
Antlers:
Use brown yarn.
Chain 6, slip stitch in the 2nd chain, and sc along.
Repeat with smaller branches using shorter chains.
Make 2 and sew them to the top of the head.
Legs:
Make 4 small tubes starting with 6 sc in a magic ring.
Crochet around for 6–8 rounds.
Slightly stuff and attach to the lower part of the body.
Adding Details and Assembly
Once all parts are crocheted, it’s time to assemble your mini reindeer and give it personality.
Assembly Steps:
Sew the ears to each side of the head.
Attach the antlers symmetrically on top.
Position the legs evenly to ensure balance when sitting or standing.
Use a yarn needle to weave in all ends neatly.
Decorative Options:
Add a small red ribbon around the neck.
Stitch a tiny bell or heart button for a festive touch.
Lightly blush the cheeks with pink yarn or fabric paint.
Safety Note: If gifting to a baby, avoid any detachable decorations such as bells or buttons. Stick to embroidered or crocheted details only.
Creative Uses and Variations
The beauty of this crochet mini reindeer lies in its versatility. You can personalize it for any occasion or style.
Ideas for Use:
Christmas Ornament: Add a loop to hang it on a Christmas tree.
Baby Mobile: Make several reindeers and attach them to a mobile for nursery decor.
Gift Topper: Use it as a charming decoration on gift boxes.
Keychain or Bag Charm: Attach a small ring to turn it into an accessory.
Variations:
Change the nose color for different characters (red for Rudolph, black for a classic deer).
Experiment with glitter yarn or add a tiny scarf for a winter look.
Adjust size by using thinner or thicker yarn.
Finishing Touch: Once finished, take a soft brush to fluff the surface slightly. This gives your crochet reindeer a plush, cozy look — perfect for babies or festive gifts.
Conclusion Creating a tiny crochet reindeer for mini baby gifts is a joyful and rewarding project for any crafter. With a few simple stitches, you can make a charming keepsake that spreads warmth and happiness. Whether used as a toy, ornament, or gift, your handmade reindeer will always carry the magic of love and craftsmanship. Pick your favorite yarn, follow these easy steps, and start crocheting your own adorable holiday companion today!


